Features Introduction
1. This software is used for creating 3D lenticular images with strong stereoscopic effects, high clarity, and simple operation. It can reduce production time by up to 80%.
Supports 3D, flip, and animation effects, which can be combined.
2. Editable single-layer line art with full flexibility: move, scale, bring forward, send backward, move across layers, cut, paste, and add/delete/move vertices.
3. Supports up to 999 lenses, with fast performance and optimized memory usage.
4. Import large-size PSD files to enhance image precision from the source. Enables quick creation of large 3D images even on standard computers.
5. Export large TIF images up to 40 GB, with vertical compression, automatic tiling, and centerline alignment.
6. Supports RGB and CMYK color modes, and seamless pattern creation for high-definition 3D backgrounds.
7. Export PSD sequences, animated GIFs, and red-blue anaglyph images.
8. Automatically displays displacement values; single-layer line art can extend beyond boundaries by up to 2 cm.
9. Compatible with Windows XP, 7, 8, 10, and Windows installed on MAC machines.
Software Registration No.: 2009SR039988
- Operating System: Windows XP, 7, 8, 10 (32-bit & 64-bit)
- Hard Disk Space: 40 GB or more
- Memory (RAM): 8 GB or more
- Ports: 1 USB port
Installation Instructions:
- Download & Extract: Download the package and extract the files.
- Install: Run the setup program and follow the default installation steps.
- Run as Administrator (Windows 7 and above):
- During installation and every time you use the software, you must right-click the program icon and select “Run as administrator”.
- Antivirus Software:
- If your antivirus software triggers an alert, please pause the installation.
- Add the program to your antivirus software’s whitelist (or allowlist/exclusions).
- Then, resume the installation process.
This software is designed for creating lenticular images with exceptional stereoscopic effects, high resolution, and an intuitive workflow that can reduce production time by up to 80%.
- It supports PSD layer shifting, free combination of 3D and flip effects, and conversion of single-layer line art into 3D.
- Editable single-layer line art allows full control: move, scale, bring forward, send backward, transfer across layers, cut, paste, and add/delete/relocate vertices.
- Capable of processing up to 999 lens columns with high speed and optimized memory usage.
- Import large PSD files to ensure precision from the start—enabling even standard computers to produce large 3D images quickly.
- Export TIF images up to 40 GB with vertical compression, reducing file size to a fraction with negligible quality loss and significantly faster processing.
- Automatic tiling and centerline alignment ensure multi-image layouts align perfectly with the lenticular lens grid.
- Supports RGB and CMYK color modes without conversion loss for print-ready results, plus seamless patterns for high-definition 3D backgrounds.
- Export PSD files for easy library building or further editing in Photoshop.
- Generate animated GIFs and red-blue anaglyph images for client review or online presentation.
- Automatically displays displacement values and allows line art to extend up to 2 cm beyond borders.
- New per-layer depth control lets you adjust stereoscopic intensity individually for each line layer.
- Global depth and layer-based displacement values are independent; strengthen or soften the 3D effect by adjusting the overall depth setting.
- (Overall Depth × Layer Displacement = Final Displacement Value)
- Preview the complete composition without checking each layer individually—saving significant time with complex projects.
- Save all parameters for future edits.
Try for free. Output your first image for just $2 usd—making 3D accessible to everyone.
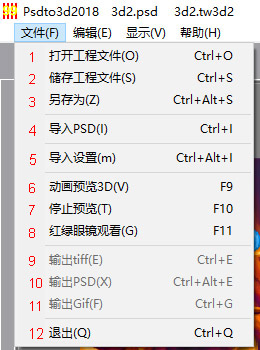
- New Project & Import PSD: Create a new project and import a PSD file. Supports both RGB and CMYK color modes.
- Open Existing Project: Open a previously saved project file (extension: .tw3d3). Backward compatible with older versions.
- Save: Save the current project.
- Save As…: Save the project under a new name or location.
- Import Parameters: Import settings from a .tw3d3 file (parameters only, excludes the PSD image).
- Preview 3D Effect: Generates an animated sequence from the image series for evaluating the 3D effect.
- Stop Preview: Stops the preview animation. Required before performing other operations after previewing.
- Preview Anaglyph (Red/Blue): Displays a red/blue 3D preview for use with anaglyph glasses.
- Export TIFF (Lenticular): Outputs the final lenticular TIFF file. This image will appear blurry until printed and combined with a lenticular lens.
- Export PSD Sequence: Exports the image series as separate PSD layers.
- Export Animated GIF: Creates an animated GIF for online presentation or client review.
- Exit: Closes the application.
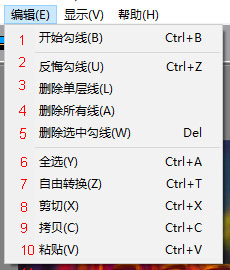
- Begin Outline: Left-click to place points, right-click to close the outline. Use outlining to add a 3D effect to objects.
- Undo Last Point (Ctrl+Z): Reverts the last point placement. (Only works before the outline is closed.)
- Delete Current Outline: Removes the outline currently being drawn or selected.
- Delete Current Outline Layer: Deletes the entire active layer containing outlines.
- Delete All Outlines: Removes all outlines from the project.
- Delete Selected Outlines: Deletes only the currently highlighted outline(s).
- Select All Outlines: Highlights every outline in the project for batch editing.
- Free Scale Outline: Resize the selected outline(s) freely.
- Cut Outline (Ctrl+X): Removes the selected outline(s) and places it on the clipboard.
- Copy Outline (Ctrl+C): Copies the selected outline(s) to the clipboard.
- Paste Outline (Ctrl+V): Places the copied or cut outline(s) from the clipboard.
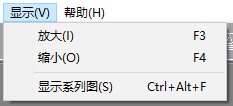
- Zoom In: Enlarges the view.
- Zoom Out: Reduces the view.
- Show Working Directory: Opens the project folder for easy access to output image sequences.
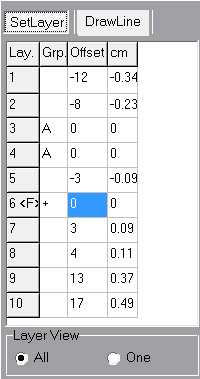
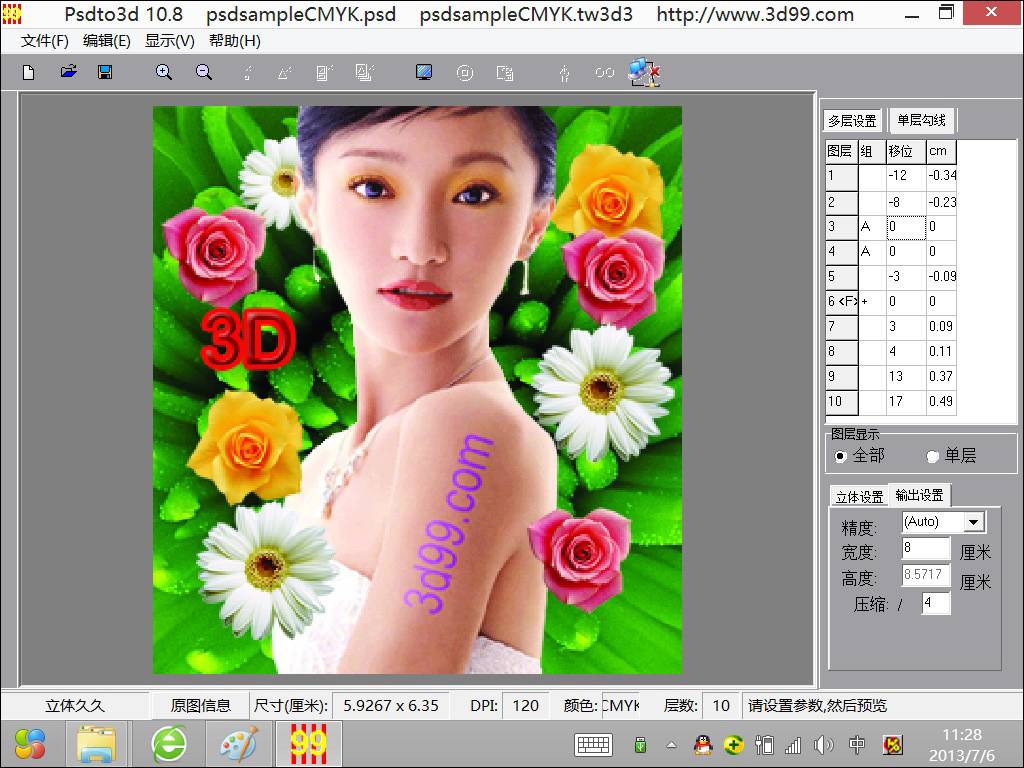
Layer List Parameters
- The numbers 1-10 in the Layer column represent the layer sequence from the original PSD file.
- Letters in the Group column (e.g., A) indicate linked layers for flip/morph effects. Layers sharing the same letter are grouped and cannot be edited with single-layer line art.
- A “+” sign means single-layer line art is applied to that layer for 3D conversion (e.g., Layer 6).
Offset Parameters
- Numbers in the Offset column set the displacement value for each layer.
- 0: No displacement.
- Negative values: “Pop-out” effect.
- Positive values: “Push-back” effect.
- The CM column shows the actual displacement distance (e.g., 0.49 cm). This value does not include additional displacement from single-layer line art.
- These values are auto-assigned on PSD import and can be adjusted as needed.
Focus Layer
- A layer marked with
<F> (e.g., Layer 6) is the focus layer. It typically has zero displacement and is used for key elements. To set it, enter the layer number in the Focus Layer field under the 3D Sets section.
Layer View Mode
- All: Displays all layers.
- One: Displays only the currently selected layer.
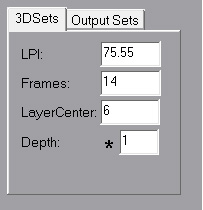
LPI (Lines Per Inch):
- The number of lenticular lens lines within one inch.
- Current lens sheets range from 9 (coarsest) to 201 (finest) LPI.
- Value should be precise to four decimal places (e.g., 75.5655).
Frames:
- The number of frames (or viewing angles) used to simulate the images seen under different lenses.
- Acceptable value range: 2 to 999.
Layer Center (Focus Layer):
- The layer number designated as the visual focal point.
- This layer remains stationary during animation previews, providing the clearest visual anchor but without pop-out or push-back effects.
- Typically used for the main subject, with surrounding layers creating the 3D context.
Depth (Depth Multiplier):
- A multiplier that adjusts the overall stereoscopic intensity.
- Default: 1 (1x depth)
- 0.5: Reduces depth effect by half.
- 3: Triples the depth effect.